简介
程序员最讨厌的事情之一就是写文档,特别是word文档,写好word文档是并不是一件简单的事,以个人经验来看如果有人提供了一份word文档给我阅读,往往阅读效率是很低下的,于是催生出了类似于Markdown或者AsciiDoc这种以编程方式来写文档的工具,通过这些工具的语法,我们可以不需要学习各种排版样式而写入清新的文档,提到rest文档,不可绕开的就是Swagger,目前项目中全部使用了Swagger,但是使用Swagger的优缺点都很明显,优点:方便的工具让前端联调接口更简单,缺点:入侵式的注解让代码看起来杂乱无章,且文档不够直观等,在这些原因的驱使下让我去寻找一款更加清晰的文档工具,本人发现了2款文档工具 1:smart-doc 它是一款非入侵似的文档框架,采用类似java doc的标准注释来生成文档,这也强迫用户必须写注释,但是缺点是由于采用了注释,很多情况下不够灵活,第二个就是Spring Rest doc,来自Spring官方的Spring res doc, 生成的文档样式可以参考Spring的官方文档,其采用AsciiDoc作为编写文档的工具,美观,且更加灵活,并且其于单元测试强制绑定,也驱使我们培养出写单元测试的良好习惯,所以我这里采用Sprng rest doc来编写文档
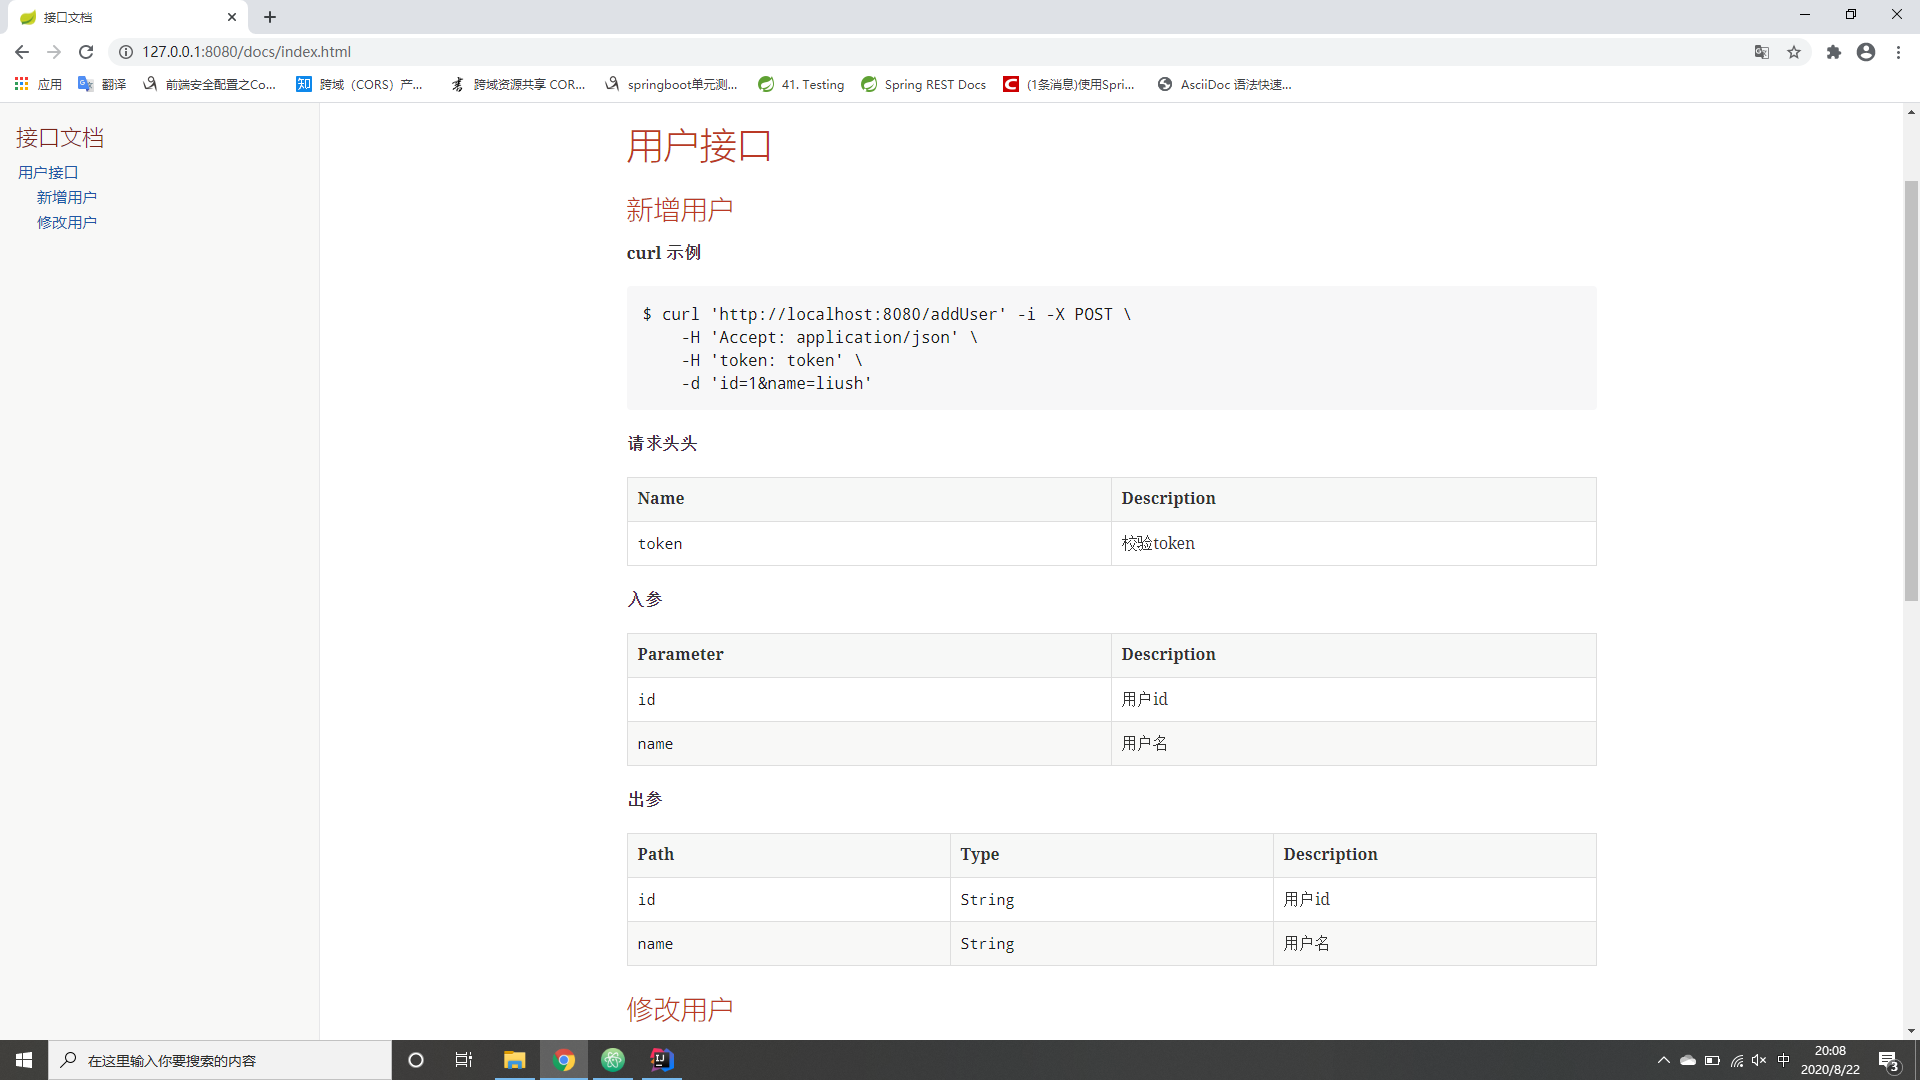
效果图

创建项目
demo代码https://github.com/liushprofessor/hase_repository/tree/master/spring_test
以下是我创建的MAVEN工程的Pom文件,由于Spring rest doc 是和单元测试签字绑定所以我这里引入了Springtest的包,并且引入Sprig rest doc的包spring-restdocs-mockmvc
我们重点来关注一下plugin,其定义了3个maven插件,spring-boot-maven-plugin没什么好说的,springboot打包插件,asciidoctor-maven-plugin其作用将为asciidoctor文档打包成html样式的文档,其绑定了maven的prepare-packet生命周期,在执行到该周期时自动将asciidoc的文件转成html,还有一个参数我们需要注意${snippetsDirectory},该配置规定了生成asciidoc文件的目录,第三个插件就是maven-resources-plugin,其同样绑定在prepare-packet什么周期,该插件的左右就是在打包时规定资源生成的路径,比如我这里将${project.build.directory}/generated-docs 目录下生成的html文件在打包时放入到static的docs文件下, 因为Maven规定 resources 下的static 目录是放置静态资源的目录,所以我们将生成的html放在该目录下,那么可以直接访问里面的文档.
1
2
3
4
5
6
7
8
9
10
11
12
13
14
15
16
17
18
19
20
21
22
23
24
25
26
27
28
29
30
31
32
33
34
35
36
37
38
39
40
41
42
43
44
45
46
47
48
49
50
51
52
53
54
55
56
57
58
59
60
61
62
63
64
65
66
67
68
69
70
71
72
73
74
75
76
77
78
79
80
81
82
83
84
85
86
87
88
89
90
91
92
93
94
95
96
97
98
99
100
101
102
103
104
105
106
107
108
| <?xml version="1.0" encoding="UTF-8"?>
<project xmlns="http://maven.apache.org/POM/4.0.0"
xmlns:xsi="http://www.w3.org/2001/XMLSchema-instance"
xsi:schemaLocation="http://maven.apache.org/POM/4.0.0 http://maven.apache.org/xsd/maven-4.0.0.xsd">
<modelVersion>4.0.0</modelVersion>
<groupId>com.liu</groupId>
<artifactId>spring_test</artifactId>
<version>1.0-SNAPSHOT</version>
<properties>
<snippetsDirectory>${project.build.directory}/generated-snippets</snippetsDirectory>
</properties>
<parent>
<groupId>org.springframework.boot</groupId>
<artifactId>spring-boot-starter-parent</artifactId>
<version>2.1.9.RELEASE</version>
<relativePath/>
</parent>
<dependencies>
<dependency>
<groupId>org.springframework.boot</groupId>
<artifactId>spring-boot-starter-test</artifactId>
<scope>test</scope>
</dependency>
<dependency>
<groupId>org.springframework.boot</groupId>
<artifactId>spring-boot-starter-web</artifactId>
</dependency>
<dependency>
<groupId>org.springframework.restdocs</groupId>
<artifactId>spring-restdocs-mockmvc</artifactId>
<scope>test</scope>
</dependency>
<dependency>
<groupId>com.alibaba</groupId>
<artifactId>fastjson</artifactId>
<version>1.2.47</version>
</dependency>
</dependencies>
<build>
<plugins>
<plugin>
<groupId>org.springframework.boot</groupId>
<artifactId>spring-boot-maven-plugin</artifactId>
</plugin>
<plugin>
<groupId>org.asciidoctor</groupId>
<artifactId>asciidoctor-maven-plugin</artifactId>
<version>1.5.8</version>
<executions>
<execution>
<id>generate-docs</id>
<phase>prepare-package</phase>
<goals>
<goal>process-asciidoc</goal>
</goals>
<configuration>
<backend>html</backend>
<doctype>book</doctype>
<attributes>
<snippets>${snippetsDirectory}</snippets>
</attributes>
</configuration>
</execution>
</executions>
<dependencies>
<dependency>
<groupId>org.springframework.restdocs</groupId>
<artifactId>spring-restdocs-asciidoctor</artifactId>
<version>2.0.5.BUILD-SNAPSHOT</version>
</dependency>
</dependencies>
</plugin>
<plugin>
<!-- 自定义打包插件讲文档位置打包时放入固定位置 -->
<artifactId>maven-resources-plugin</artifactId>
<executions>
<execution>
<id>copy-resources</id>
<phase>prepare-package</phase>
<goals>
<goal>copy-resources</goal>
</goals>
<configuration>
<outputDirectory>${project.build.outputDirectory}/static/docs</outputDirectory>
<resources>
<resource>
<directory>${project.build.directory}/generated-docs</directory>
</resource>
</resources>
</configuration>
</execution>
</executions>
</plugin>
</plugins>
</build>
</project>
|
创建接口并且生成单元测试
1
2
3
4
5
6
7
8
9
10
11
12
13
| @PostMapping("/addUser")
public User addUser(User user) {
return user;
}
@PostMapping("/updateUser")
public User updateUser(@RequestBody User user) {
return user;
}
|
为了方便我将很多方法import模块时时采用了import static的方式
在写单元测试的时候我们需要注意一点,我们需要填写接收请求体的和响应请求头的 header,比如下面
的accept(MediaType.APPLICATION_JSON)和contentType(MediaType.APPLICATION_JSON),不然在采用非
MediaType.TEXT_PLAIN 格式的请求体的时候会报错,然后我们关注一下
andDo(document ….这后面的代码,这部分代码就是编写 文档的代码,以下第一个测试接口为例,我们在documet方法内指定了addUser参数,这个参数代表我们会在之前在 maven plugin中配置的配置的
${project.build.directory}/generated-snippets 目录下生成了一个addUser文件夹,这文件夹下存放了asciidoc的文件
到这里你可能不太明白,到后面我们编译出文件后你就会明白了,requestHeaders是设置请求头,里面的方法headerWithName
设置了请求头说需要的参数,description为这个请求头的描述,后续spring rest doc会根据这些方法生成对应的表格文件,
requestParameters 方法设置了请求体的参数,parameterWithName方法设定了请求参数的具体值, responseFields方法可以理解为设置响应体,fieldWithPath
方法为设置响应体具体的参数
1
2
3
4
5
6
7
8
9
10
11
12
13
14
15
16
17
18
19
20
21
22
23
24
25
26
27
28
29
30
31
32
33
34
35
36
37
38
39
40
41
42
43
44
45
46
47
48
49
50
51
52
53
54
55
56
57
58
59
60
61
62
63
64
65
66
67
68
69
70
71
72
73
74
75
76
77
78
79
80
81
82
83
84
85
86
87
88
89
90
91
92
93
94
95
96
97
98
99
100
101
102
103
104
105
106
107
108
109
110
| package com.test;
import static org.junit.Assert.*;
import com.alibaba.fastjson.JSON;
import org.junit.Before;
import org.junit.Rule;
import org.junit.runner.RunWith;
import org.springframework.beans.factory.annotation.Autowired;
import org.springframework.boot.test.context.SpringBootTest;
import org.springframework.http.MediaType;
import org.springframework.restdocs.JUnitRestDocumentation;
import org.springframework.test.context.junit4.SpringRunner;
import org.springframework.test.web.servlet.MockMvc;
import static org.springframework.restdocs.mockmvc.MockMvcRestDocumentation.documentationConfiguration;
import static org.springframework.restdocs.payload.PayloadDocumentation.*;
import static org.springframework.restdocs.payload.PayloadDocumentation.fieldWithPath;
import static org.springframework.restdocs.request.RequestDocumentation.requestParameters;
import org.springframework.test.web.servlet.setup.MockMvcBuilders;
import org.springframework.web.context.WebApplicationContext;
import static org.hamcrest.Matchers.*;
import static org.springframework.test.web.servlet.request.MockMvcRequestBuilders.post;
import static org.springframework.test.web.servlet.result.MockMvcResultMatchers.jsonPath;
import static org.springframework.test.web.servlet.result.MockMvcResultMatchers.status;
import static org.springframework.restdocs.mockmvc.MockMvcRestDocumentation.document;
import static org.springframework.restdocs.headers.HeaderDocumentation.*;
import static org.springframework.restdocs.request.RequestDocumentation.*;
/**
* @author Liush
* @description
* @date 2020/8/19 21:08
**/
@RunWith(SpringRunner.class)
@SpringBootTest
public class Test {
@Autowired
private WebApplicationContext webApplicationContext;
@Rule
public JUnitRestDocumentation restDocumentation = new JUnitRestDocumentation("target/generated-snippets");
private MockMvc mockMvc;
@Before
public void setUp(){
mockMvc=MockMvcBuilders.webAppContextSetup(webApplicationContext).apply(documentationConfiguration(restDocumentation)).build();
}
/**
* requestFields 可以理解为添加的示例数据入{"id":"222","name":"Liush"}
* responseFields 同理
* requestParameters 为入参数,使用此方法添加后会生成入场表格文件
*/
@org.junit.Test
public void addUserTest()throws Exception{
mockMvc.perform(post("/addUser").accept(MediaType.APPLICATION_JSON).param("id","1").
param("name","liush").header("token","token")
).andExpect(jsonPath("$.id",is("1"))).andExpect(jsonPath("$.name",is("liush"))).
andExpect(status().isOk()).andDo(document("addUser",
requestHeaders(headerWithName("token").description("校验token")),
requestParameters(parameterWithName("id").description("用户id"),
parameterWithName("name").description("用户名")
),
responseFields(fieldWithPath("id").description("用户id"),
fieldWithPath("name").description("用户名")
)
));
}
@org.junit.Test
public void updateUser() throws Exception {
User user=new User("222","Liush");
mockMvc.perform(post("/updateUser").accept(MediaType.APPLICATION_JSON).contentType(MediaType.APPLICATION_JSON).content(JSON.toJSONString(user)))
.andExpect(jsonPath("$.id",is("222"))).andExpect(status().isOk()).
andDo(document("updateUser",
requestFields(fieldWithPath("id").description("用户id"),
fieldWithPath("name").description("用户名")
), responseFields(fieldWithPath("id").description("用户id"),fieldWithPath("name").description("用户名"))
))
;
}
}
|
看到这里你也许会有点懵,不过没关系,下面我们执行 mvn clean package命令查看具体目录结构后你就会一目了然vn
执行完该命令后,进入到target目录,下面会生成generated-snippets的目录,其有生成了一个addUser的目录
目录名字之前我们在document方法中指定了,其下又有9个文件,如果你对AsciiDoc有一些
了解你就会知道这些事AsciiDoc的文件
1
2
3
4
5
6
7
8
9
| curl-request.adoc
http-request.adoc
http-response.adoc
httpie-request.adoc
request-body.adoc
request-headers.adoc
request-parameters.adoc
response-body.adoc
response-fields.adoc
|
打开request-parameters.adoc文件,发现其已经将我们的请求体参数自动生成了表格
1
2
3
4
5
6
7
8
9
10
| |===
|Parameter|Description
|`+id+`
|用户id
|`+name+`
|用户名
|===
|
生成html文档
上面我们已经生成了AsciiDoc文件,现在我们就要将这些文件转换成html文档,首先我们需要在maven main
目录下新建一个asciidoc目录,里面新建一个index.adoc的文件,该文件名可以随意取,
我们编辑该文件,我们采用AsciiDoc语法写入一个文档,如果不熟悉AsciiDoc的语法可以
自行百度一下,很简单,我们重点关注
include命令,这里执行的就是将我们之前采用Spring rest doc生成的asccidoc文件引入到主文档来
我们再执行mvn clean package,我们就会再target目录下的 classes下的static下的docs下发现一个index.html
的html文档,然后我们访问该页面就能得到一个和Spring官方文档一样清爽的文档了.
1
2
3
4
5
6
7
8
9
10
11
12
13
14
15
16
17
18
19
20
21
22
23
24
25
26
27
28
29
| = 接口文档
:author: liush
:email: 442549007@qq.com
:revnumber: v1.0
:toc: left
:toc-title: 接口文档
== 用户接口
=== 新增用户
*curl 示例*
include::{snippets}\addUser\curl-request.adoc[]
*请求头头*
include::{snippets}\addUser\request-headers.adoc[]
*入参*
include::{snippets}\addUser\request-parameters.adoc[]
*出参*
include::{snippets}\addUser\response-fields.adoc[]
=== 修改用户
*curl 示例*
include::{snippets}\updateUser\curl-request.adoc[]
*入参*
include::{snippets}\updateUser\request-fields.adoc[]
*入参示例*
include::{snippets}\updateUser\request-body.adoc[]
*出参*
include::{snippets}\updateUser\response-fields.adoc[]
*出参示例*
include::{snippets}\updateUser\response-body.adoc[]
|

